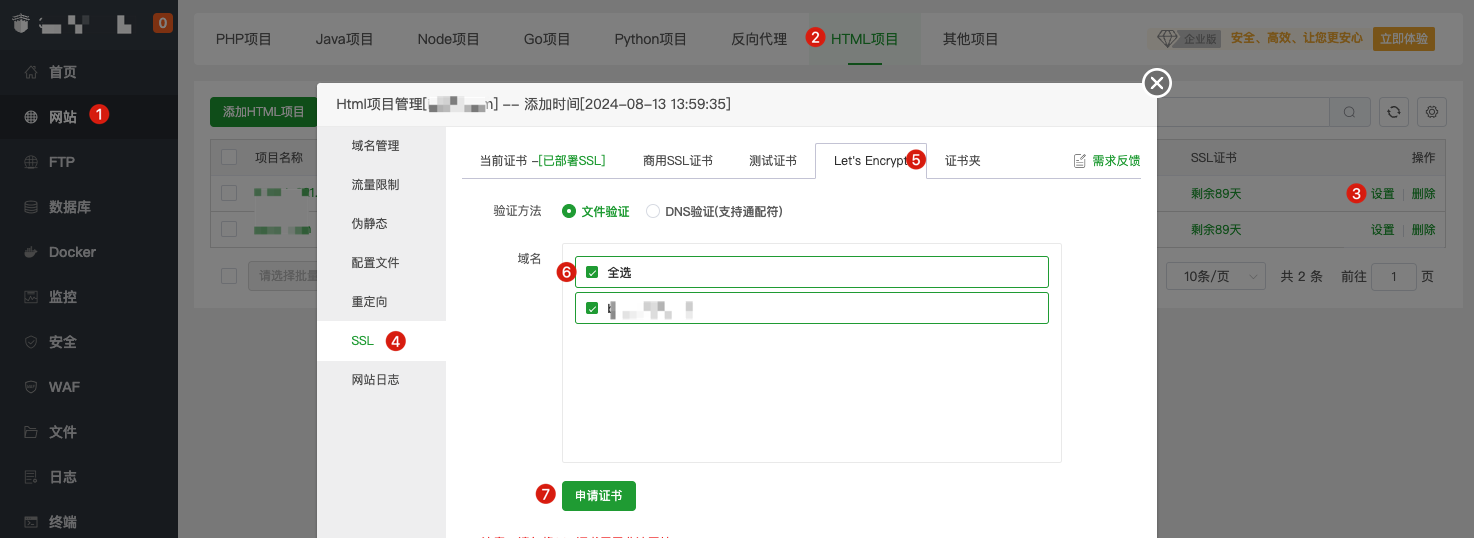
在宝塔面板上操作
网站 - 找到项目 - 设置 - SSL - Let’s Encrypt - 选择域名 - 申请证书

申请完成后,会自动跳转到当前证书 Tab 页,点击保存即可
使用 ACME 客户端管理
参考官方文章
https://letsencrypt.org/getting-started/
https://certbot.eff.org/instructions?ws=nginx&os=snap
这种方式更麻烦,但可以大概知道整个过程,宝塔一键部署的方式大概也是做了这些事情。
Let’s Encrypt 推荐使用 Certbot
For most people we recommend the Certbot ACME client. The Certbot website has excellent documentation and instructions for operating Certbot.
由于我使用的是 centos,我使用 snap 来安装 certbot
-
使用
yum或dnf安装 snap,yum install snapd -
启动 snap,
systemctl enable --now snapd.socket -
ln -s /var/lib/snapd/snap /snap -
使用 snap 安装
certbot,snap install --classic certbot -
ln -s /snap/bin/certbot /usr/bin/certbot
接下来我使用先申请证书再手动部署的方式,而不是sudo certbot --nginx(这种方式会自动修改 nginx 配置文件),正如文档所说,If you’re feeling more conservative and would like to make the changes to your nginx configuration by hand, run this command. 我更加谨慎一点。
-
首先确认 域名已经解析,并且在宝塔上网站项目已经填写了域名,并可以通过 http 协议访问了
-
未某个域名申请证书
certbot certonly -d 替换真实域名 -
执行上述命令后,选择 3
-
How would you like to authenticate with the ACME CA? - - - - - - - - - - - - - - - - - - - - - - - - - - - - - - - - - - - - - - - - 1: Nginx Web Server plugin (nginx) [Misconfigured] 2: Runs an HTTP server locally which serves the necessary validation files under the /.well-known/acme-challenge/ request path. Suitable if there is no HTTP server already running. HTTP challenge only (wildcards not supported). (standalone) 3: Saves the necessary validation files to a .well-known/acme-challenge/ directory within the nominated webroot path. A separate HTTP server must be running and serving files from the webroot path. HTTP challenge only (wildcards not supported). (webroot) -
随后要求输入 webroot,这里去项目的 nginx 配置中找到下面这部分,这部分是宝塔自动配置的
-
location /.well-known/ { root /www/wwwroot/java_node_ssl; } -
然后填写
root后面这个路径,即/www/wwwroot/java_node_ssl, 随后相关文件会放在这里,并通过 HTTP 协议对/.well-known/进行验证 -
最后会把证书的路径打印在控制台上
-
把证书的相关信息手动配置在 nginx 的配置文件中,随后检查并重启 nginx 即可,例如
-
server {
    listen 443 ssl;
    ssl_certificate /etc/letsencrypt/live/证书路径/fullchain.pem;
    ssl_certificate_key /etc/letsencrypt/live/证书路径/privkey.pem;
    ssl_protocols TLSv1 TLSv1.1 TLSv1.2 TLSv1.3;
    ssl_prefer_server_ciphers on;
    ...
关于证书的自动刷新
The Certbot packages on your system come with a cron job or systemd timer that will renew your certificates automatically before they expire. You will not need to run Certbot again, unless you change your configuration. You can test automatic renewal for your certificates by running this command:
有定时任务来进行自动刷新。可以通过下面的命令来检查。
sudo certbot renew --dry-run
The command to renew certbot is installed in one of the following locations:
/etc/crontab//etc/cron.*/*systemctl list-timers
证书文件自动刷新,但 nginx 不会自动更新,建议增加一个定时任务,每天进行一次 nginx -s reload